Real Estate Photo Editing: Remove Clutter and Perfect Property Backgrounds
Real Estate Photo Editing: Remove Clutter and Perfect Property Backgrounds
First impressions in real estate happen online. According to the National Association of Realtors, 97% of home buyers use the internet during their home search, and the very first thing they evaluate is the listing photos. A property with polished, professional images receives significantly more clicks, more showings, and ultimately sells faster and at a higher price than one with mediocre snapshots.
Yet producing flawless real estate photos is rarely straightforward. Overflowing trash bins, parked cars, overcast skies, neighboring eyesores, and empty rooms that feel lifeless all conspire to drag down a listing's visual appeal. The traditional solution -- hiring a professional retoucher for every shot -- is expensive and slow.
That is where AI-powered background removal and photo editing changes the game. In this guide, you will learn exactly how to use these tools to create listing photos that compete with the best in the market, whether you are a real estate agent, a property photographer, or a homeowner selling on your own.
Why Photo Quality Directly Impacts Real Estate Sales
The connection between listing photo quality and sales outcomes is not anecdotal. Multiple industry studies have confirmed the relationship:
- Listings with high-quality photos sell 32% faster on average compared to those with amateur images.
- Homes photographed professionally can command a price premium of 3-11% over comparable properties with standard photos.
- The median online attention span for a listing is under 20 seconds -- blurry, cluttered, or poorly lit photos cause buyers to scroll past immediately.
- Real estate portals like Zillow and Realtor.com use photo quality signals to influence search result rankings, meaning better photos lead to more visibility.
In practical terms, every dollar invested in better listing photos generates outsized returns. And with modern AI tools, the cost of achieving professional-grade results has dropped dramatically.
Common Real Estate Photo Problems
Even skilled photographers face challenges that are often outside their control. Here are the most frequent issues that diminish listing photo quality:
Exterior Shot Problems
- Cluttered yards and driveways: Toys, garden hoses, garbage cans, and parked vehicles distract from the property itself.
- Unattractive neighboring properties: A beautifully maintained home can be undermined by a rundown house next door.
- Unfavorable weather and skies: Overcast, grey skies make properties look dull and uninviting. Rain during the scheduled shoot day is a common setback.
- Utility lines and poles: Overhead wires cutting across the frame reduce the visual appeal of exterior shots.
- Seasonal issues: Bare trees in winter, dead grass in summer, or leaf piles in autumn can make a property look neglected.
- Construction nearby: Scaffolding, dumpsters, or roadwork in the background is distracting and off-putting.
Interior Shot Problems
- Empty rooms: Vacant properties feel cold and make it hard for buyers to envision living there. Rooms also appear smaller without furniture for scale.
- Clutter and personal items: Family photos, piles of mail, overflowing shelves, and general mess make spaces feel cramped.
- Outdated or mismatched decor: Dated wallpaper, worn carpets, and clashing furniture styles can turn buyers away.
- Poor lighting: Dark corners, harsh shadows, and mixed lighting temperatures create unflattering interiors.
- Visible damage: Stains, scuff marks, and minor imperfections are amplified in photographs.
How AI Background Removal Solves These Problems
AI background removal uses deep learning models to automatically separate subjects from their surroundings at the pixel level. For real estate, this capability unlocks several powerful editing workflows.
Isolate the Property From Its Surroundings
The most direct application is removing everything around the property itself. Upload an exterior shot, and the AI identifies the building as the primary subject, generating a precise mask that separates it from the background. Once isolated, you can:
- Place the property against a clean, neutral background for a polished look.
- Composite it onto a different environment -- perhaps a lush green lawn or a picturesque streetscape.
- Remove neighboring buildings, vehicles, or other distractions without tedious manual editing.
Replace Dull Skies Instantly
Sky replacement is one of the highest-impact edits in real estate photography. A dramatic blue sky with soft clouds transforms an ordinary exterior shot into a compelling, aspirational image. With AI background removal:
- Upload the original photo with the grey or washed-out sky.
- The AI separates the sky from the property and landscape.
- Replace the removed sky with a vibrant alternative.
- The result looks natural and immediately more appealing.
This single edit can make the difference between a buyer clicking on your listing or scrolling past it.
Remove Exterior Distractions
Rather than removing the entire background, AI tools can selectively isolate and remove specific elements:
- Garbage bins and recycling carts placed at the curb on shoot day.
- Parked cars in the driveway or on the street in front of the home.
- Construction equipment or temporary signage.
- Overhead wires crossing the frame.
- People or pets who wandered into the shot.
Clean Up Interior Spaces
For interior shots, AI background removal enables:
- Removing clutter from countertops, tables, and floors.
- Eliminating personal items like family photos and children's artwork from walls.
- Creating clean backdrops behind kitchen islands, bathroom vanities, and living areas.
Virtual Staging: Filling Empty Rooms With AI
One of the most valuable applications of AI photo editing in real estate is virtual staging. Empty rooms are one of the biggest challenges in property marketing -- buyers struggle to gauge room size and imagine how furniture would fit.
What Is Virtual Staging?
Virtual staging uses AI and digital editing to add realistic furniture, decor, and accessories to photos of empty rooms. The result is a fully furnished-looking space created entirely from software.
How Virtual Staging Works
- Photograph the empty room with good lighting and straight angles.
- Remove any remaining items (cleaning supplies, leftover boxes) using AI background removal.
- Select a furniture style that matches the property's target demographic -- modern, farmhouse, minimalist, traditional.
- Place virtual furniture using staging software that accounts for perspective, shadows, and lighting.
- Export the final image for your listing.
Virtual Staging Best Practices
- Match the style to the neighborhood and price point. A luxury penthouse calls for different staging than a starter home.
- Do not overfill rooms. Keep it realistic -- a few well-chosen pieces make the space feel inviting without appearing cluttered.
- Always disclose virtual staging in your listing. Transparency builds trust with buyers and is required by many MLS boards.
- Maintain consistent style across all rooms in a single listing for a cohesive presentation.
- Use realistic shadows and lighting. Poor virtual staging with floating furniture or mismatched lighting looks worse than an empty room.
Before and After Scenarios
To illustrate the impact of AI-powered editing, here are common transformation scenarios:
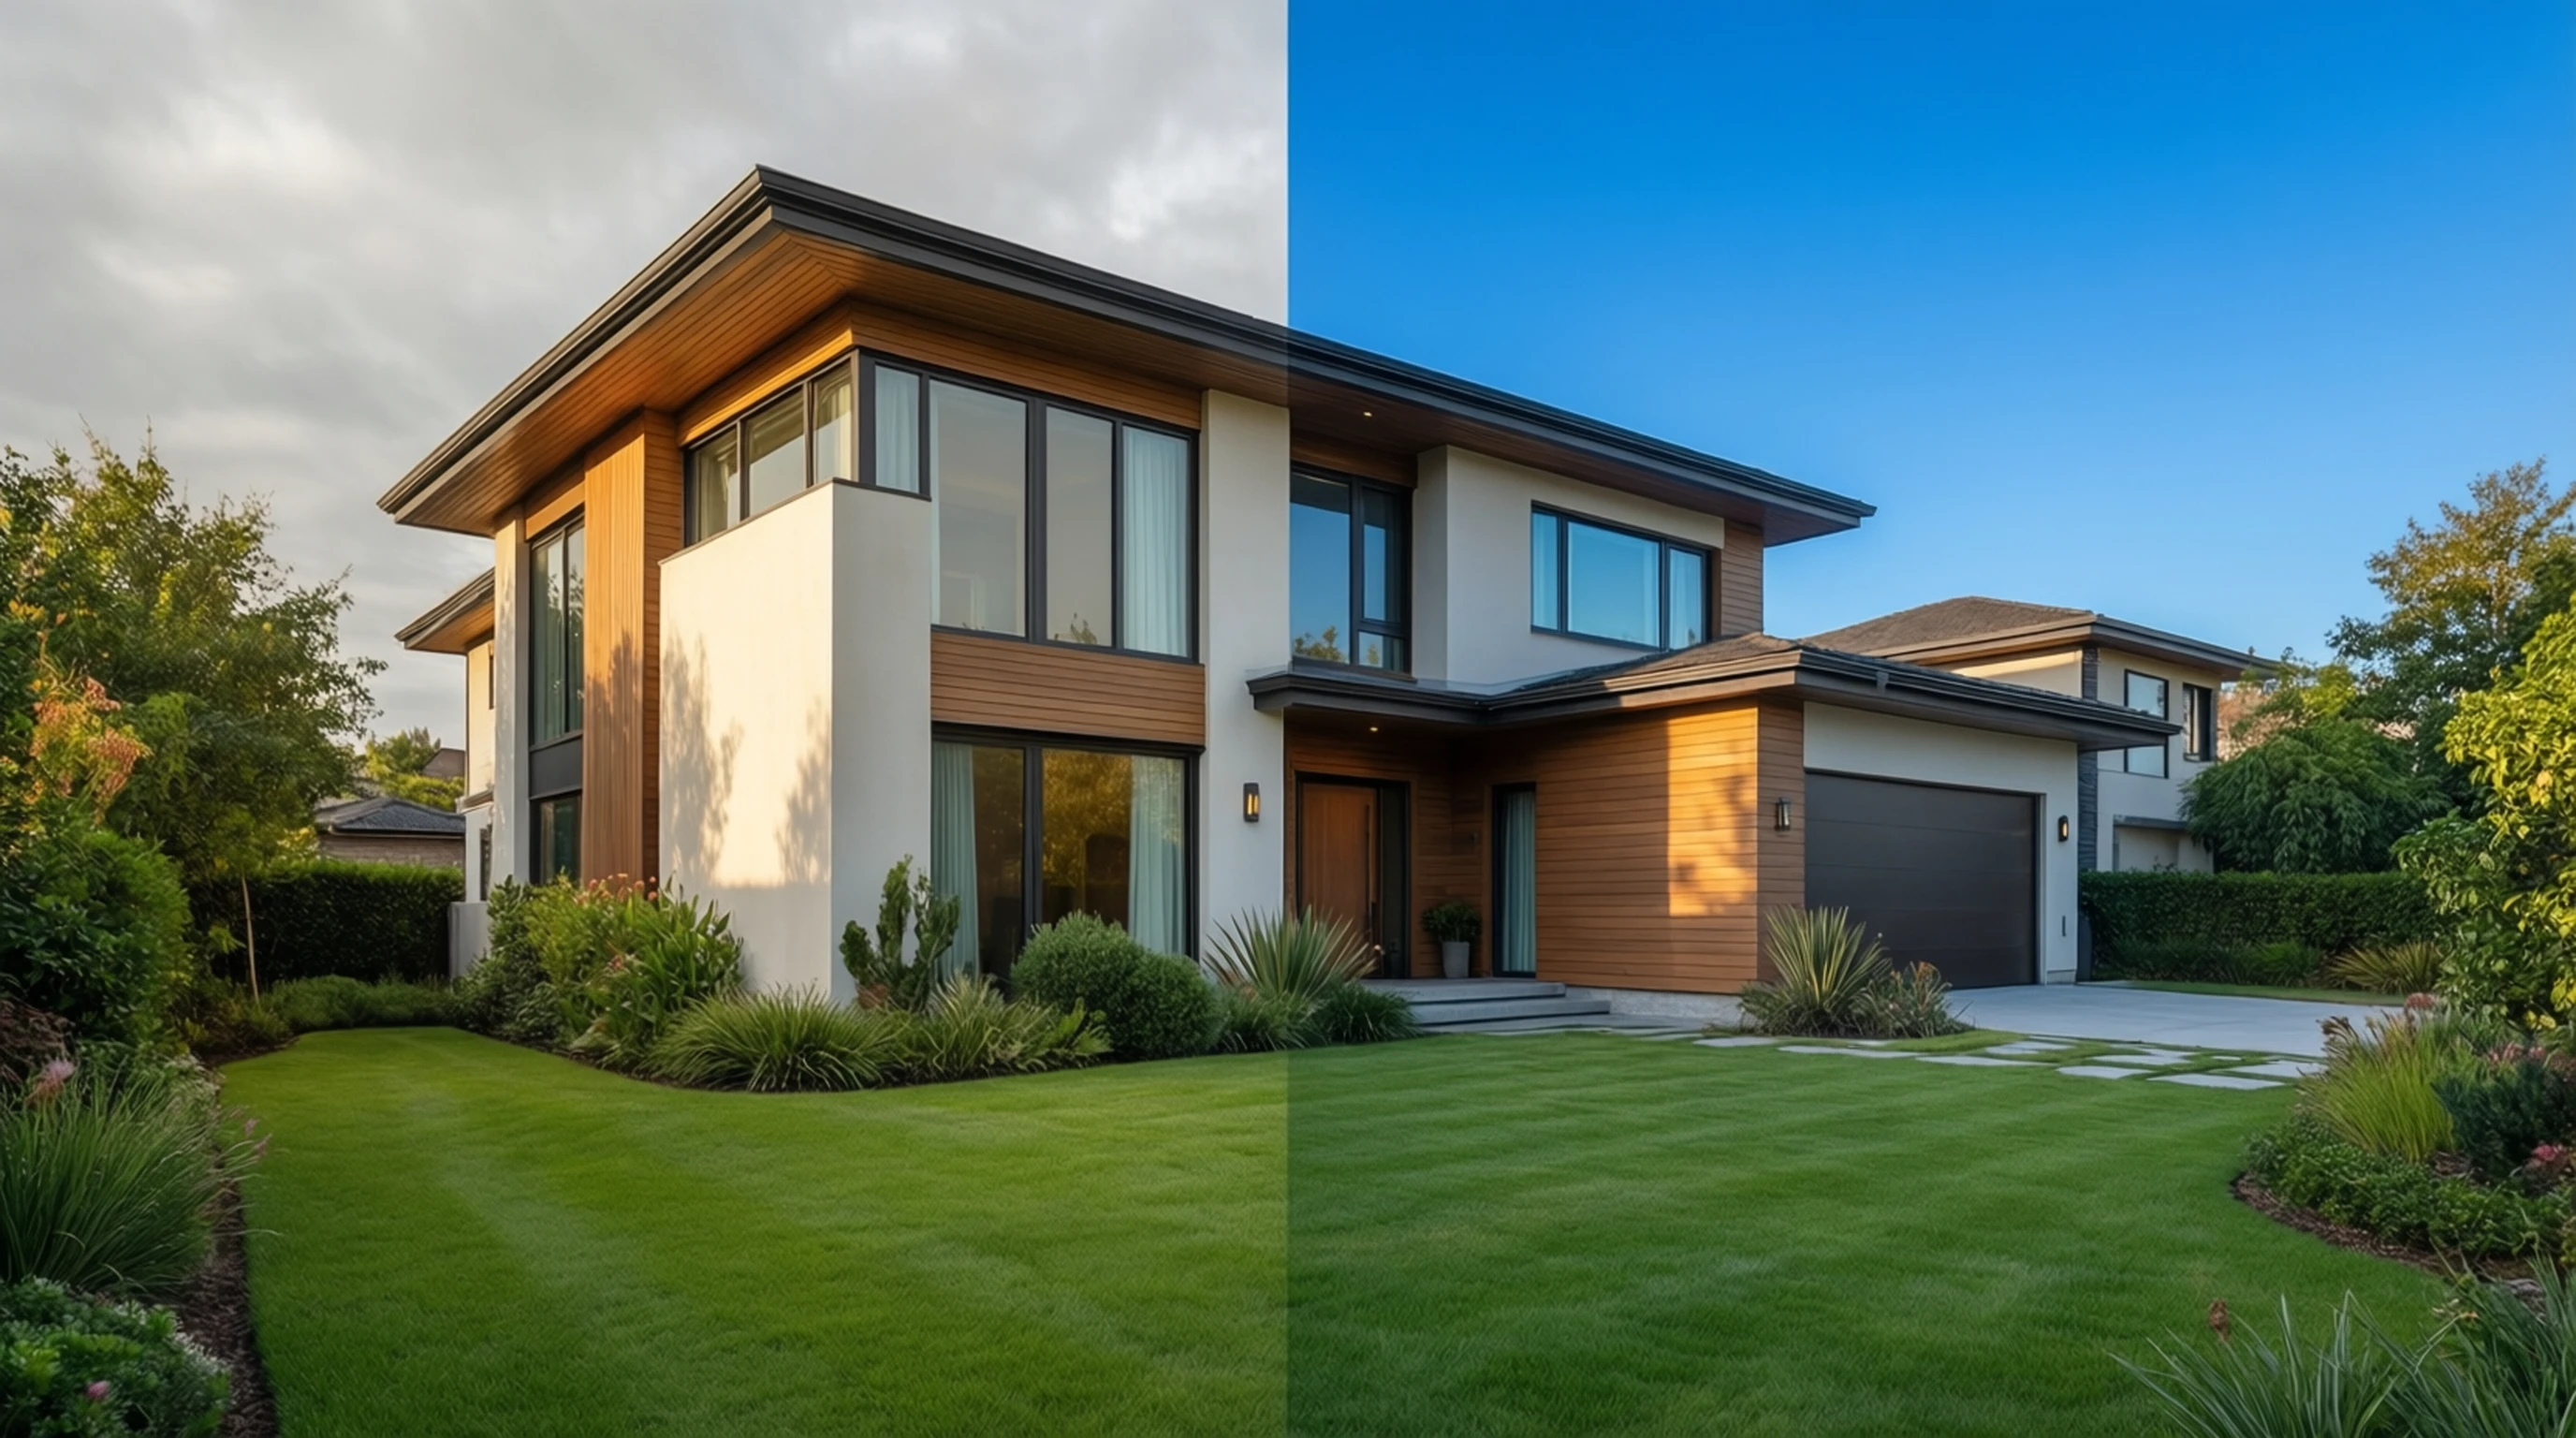
Exterior: Overcast Day to Blue Sky
Before: A well-maintained colonial home photographed on a grey, rainy afternoon. The sky is flat white, the lawn looks dull, and the overall mood is dreary.
After: The overcast sky is replaced with a vibrant blue sky featuring soft white clouds. Colors appear more saturated and the property looks warm and inviting. The transformation takes under a minute with AI sky replacement.
Exterior: Cluttered Street View
Before: A charming bungalow partially obscured by parked cars, trash bins at the curb, and a neighbor's unkempt yard visible in the frame.
After: Distracting elements are removed. The focus is entirely on the property with a clean, uncluttered streetscape. Buyers can appreciate the home's curb appeal without visual noise.
Interior: Vacant Living Room
Before: A large, empty living room with bare walls and no furniture. The space feels cold and it is impossible to tell how large it actually is.
After: Virtual staging adds a modern sofa, coffee table, area rug, and tasteful wall art. The room now feels warm, proportionate, and move-in ready. Buyers can immediately picture themselves living there.
Interior: Cluttered Kitchen
Before: A recently renovated kitchen with beautiful countertops and cabinetry, but cluttered with appliances, mail, children's homework, and miscellaneous items on every surface.
After: AI-assisted editing removes the clutter, revealing the clean lines and quality finishes. The kitchen looks spacious, organized, and ready for its close-up.
Tips for Real Estate Agents and Photographers
Shooting Tips for Easier Editing
- Shoot in RAW format when possible. RAW files give you more latitude for exposure and color correction before AI processing.
- Use a wide-angle lens (16-24mm equivalent) for interiors, but avoid ultra-wide distortion that warps walls and furniture.
- Bracket your exposures. Take multiple shots at different exposure levels so you have options for interior window views.
- Shoot on a tripod at consistent heights (approximately 4-5 feet) for uniform interior perspectives.
- Turn on all lights and open all blinds. More ambient light means fewer dark shadows to correct later.
- Remove obvious clutter before shooting. While AI can handle cleanup, starting with a tidier space produces better final results.
Editing Workflow for Maximum Efficiency
- Cull and select your best shots first. Do not waste time editing images you will not use.
- Basic corrections -- exposure, white balance, lens correction -- before AI processing.
- AI background removal for sky replacement and distraction removal.
- Virtual staging for vacant rooms.
- Final polish -- sharpening, noise reduction, and export at the correct resolution.
- Quality check -- review every image at full size before uploading to the listing.
Ethical Guidelines
- Always disclose edited photos. Most MLS systems and real estate regulations require disclosure of virtually staged or significantly altered images.
- Do not misrepresent the property. Removing a power plant next door or adding a lake view that does not exist crosses an ethical and potentially legal line.
- Label virtually staged images clearly with a watermark or caption.
- Keep structural elements accurate. Never digitally remove walls, expand rooms, or alter the actual layout.
Best Practices for Listing Photos on Major Platforms
Each real estate platform has specific requirements and best practices for listing photos:
Zillow
- Minimum resolution: 1024 x 768 pixels (higher is better).
- Recommended: At least 6 photos per listing; 20+ photos perform best.
- First photo matters most -- it appears in search results and determines click-through rate.
- Horizontal orientation is strongly preferred for the primary listing photo.
- No watermarks or branding on photos.
Realtor.com
- Supports up to 100 photos per listing.
- High-resolution images (2000+ pixels wide) display better on retina screens.
- Photo order matters -- lead with the best exterior shot, then key interior rooms.
- 3D tours and video supplement but do not replace quality still photos.
MLS (Multiple Listing Service)
- Requirements vary by local MLS -- check your board's specific guidelines.
- Common rules: No text overlays, no promotional graphics, no collage-style images.
- Virtual staging disclosure is mandatory on most MLS platforms.
- Photo dimensions: Many MLS systems crop to 4:3 aspect ratio; compose accordingly.
General Platform Best Practices
| Element | Recommendation |
|---|---|
| Image count | 25-30 photos per listing for maximum engagement |
| Resolution | Minimum 2000px wide; 4000px+ for premium listings |
| File format | JPEG at 80-90% quality for the best size-to-quality ratio |
| Aspect ratio | 3:2 or 4:3 horizontal for primary shots |
| File size | Under 10MB per image for fast loading |
| Photo order | Best exterior, kitchen, living room, primary bedroom, bathrooms, additional rooms, backyard |
| Lighting | Bright, natural-looking with balanced exposure |
| Sky condition | Blue sky with clouds (replace grey skies digitally if needed) |
Cost Comparison: Professional Services vs DIY With AI Tools
One of the strongest arguments for AI-assisted real estate photo editing is the cost savings. Here is how the options compare:
| Service | Cost per Listing | Turnaround | Quality | Scalability |
|---|---|---|---|---|
| Professional photographer + retoucher | $200-$500+ | 24-72 hours | Excellent | Limited by availability |
| Professional photographer + AI editing (DIY) | $100-$250 + free AI tool | Same day | Very good to excellent | High |
| DIY photography + professional retouching | $50-$150 retouching only | 24-48 hours | Good to very good | Moderate |
| DIY photography + AI editing | Free to minimal cost | Immediate | Good to very good | Unlimited |
| Virtual staging service | $25-$75 per room | 24-48 hours | Good to excellent | Moderate |
| AI virtual staging (DIY) | Free to $15 per room | Immediate | Good | Unlimited |
For high-value luxury listings, professional photography remains worthwhile. But for agents managing dozens of listings at various price points, the combination of decent photography skills and AI editing tools offers the best return on investment.
The Hybrid Approach
Many successful agents use a hybrid strategy:
- Luxury listings ($500K+): Full professional photography and editing package.
- Mid-range listings: Professional photographer with AI-assisted editing done in-house.
- Entry-level and rental listings: DIY photography with AI background removal and basic editing.
This tiered approach ensures every listing gets quality photos appropriate to its price point while keeping overall marketing costs manageable.
Step-by-Step: Edit a Real Estate Photo With AI Background Removal
Here is a practical walkthrough for editing a typical real estate exterior photo:
Step 1: Upload Your Property Photo
Visit our free background removal tool and upload the exterior shot. The tool accepts JPEG, PNG, and WebP formats. For best results, use an image that is at least 2000 pixels wide.
Step 2: Let the AI Process
The AI model analyzes the image in 2-3 seconds, identifying the property structure and separating it from the background elements -- sky, neighboring buildings, vehicles, and other distractions.
Step 3: Review the Mask
Examine the generated mask to ensure the property edges are clean and accurate. The AI handles complex elements like rooflines, trees near the house, and architectural details with high precision.
Step 4: Download and Composite
Download the isolated property as a transparent PNG. You can then place it on a new background with a blue sky, clean landscaping, or any environment that enhances the listing's appeal.
Step 5: Final Adjustments
Make final color and brightness adjustments to ensure the composited image looks natural. Pay attention to lighting direction -- the shadows on the property should match the new sky.
Frequently Asked Questions
Does AI background removal work well with complex architectural details?
Yes. Modern AI models are specifically trained to handle intricate edges and fine details. Rooflines, window frames, columns, railings, and ornamental features are detected with high accuracy. The AI produces a precise mask that preserves these architectural elements while cleanly separating the background.
Is it legal to digitally edit real estate listing photos?
Basic enhancements like sky replacement, clutter removal, and virtual staging are widely accepted in real estate marketing. However, most MLS boards and real estate regulations require that virtually staged photos be clearly labeled. It is not permissible to make structural alterations, add features that do not exist (such as a pool or view), or misrepresent the property's condition. Always check your local MLS rules.
How many listing photos should I edit per property?
Focus your editing efforts on the hero shot (main exterior), the kitchen, the living room or great room, and the primary bedroom. These are the photos buyers scrutinize most. For a typical listing with 25-30 photos, plan to do significant editing on 8-12 key images and basic corrections on the rest.
Can I use AI-edited photos for commercial real estate listings?
Absolutely. Commercial real estate benefits from the same AI editing techniques -- removing surrounding businesses from exterior shots, replacing grey skies, and virtually staging empty office or retail spaces. The process is identical; only the subject matter differs.
What resolution should my real estate photos be?
Aim for a minimum of 2000 pixels on the longest edge for standard listings and 4000+ pixels for luxury properties. Most real estate platforms display images at large sizes on desktop and mobile, and low-resolution photos look noticeably poor. When using AI background removal, upload the highest resolution version available for the best edge quality.
Transform Your Listings Today
Great listing photos are no longer optional -- they are the single most important marketing asset for any property. With AI-powered background removal, you can eliminate distractions, replace dull skies, clean up cluttered spaces, and even virtually stage empty rooms in minutes rather than days.
The technology is accessible, affordable, and produces results that rival expensive professional retouching. Whether you are a seasoned real estate photographer or an agent taking photos with a smartphone, AI tools level the playing field.
Ready to upgrade your real estate listing photos?
Try Our Free Background Removal Tool Now
Upload a property photo and see the difference in seconds. No account required, no watermarks, and no cost. Your next listing deserves photos that sell.